Nested Filesystem Mounting and Unmounting
For unmounting the filesystem except rootvg filesystem. Below command helps to unmount the child filesytem first, then to unmount parent.
# lsvg -o |grep -v rootvg|lsvg -il |awk '{print "umount "$NF}'|sort -r |ksh
For Mounting Filesystem except rootvg filesystem.Below command helps to mount parent filesystem before the child filesystem.
# lsvg -o |grep -v rootvg|lsvg -il |awk '{print "mount "$NF}'|sort |ksh
TWS Agent Start and Stop on AIX Server
# /opt/TDWB/ep/runtime/endpoint.sh stop
# /opt/TDWB/ep/runtime/endpoint.sh start
# ps -ef | grep -i TDWB
# /opt/TDWB/ep/runtime/endpoint.sh start
# ps -ef | grep -i TDWB
SNAP in AIX
Before running a snap .You need to Remove old snap file.
# snap -r
For IBM Software Case.
Below command collect all the information.
# snap -ac
For IBM Hardware Case
# snap -gc
snap without dump collection
# snap -aZc
# snap -gbc
Running snap with sudo. if there is no authorization to run cp command.
Create file snap.pax.Z in /tmp with your permissions and execute.
# snap -ac -d /tmp/
Flags:
-@ Gathers the workload partition information.
-a Gathers all system configuration information except HACMP™ data.
-A Gathers asynchronous (TTY) information.
-b Gathers SSA information.
-B Bypasses collection of SSA adapter dumps. The -B flag only works when the -b flag is also specified
-c Creates a compressed pax image.
-C Retrieves all the files in the fwdump_dir directory.
-D Gathers dump and /unix information. The primary dump device is used.
-d AbsolutePath (You must specify the absolute path.)
-e Gathers HACMP specific information. -e cannot be used with any other flags except -m and -d.
-f Gathers file system information.
-F Gathers flash adapter information.
-g Gathers the output of the lslpp -hac command, which is required to recreate exact operating system environments.
-G Includes predefined Object Data Manager (ODM) files in general information collected with the -g flag.
-i Gathers installation debug vital product data (VPD) information.
-k Gathers kernel information
-l Gathers programming language information.
-L Gathers LVM information.
-m Nodelist Node name list (separated by commas) to gather HACMP information.
-M Timeout Specifies the maximum time out value in seconds, that the snap frame work waits before it kills one registered external product debug data command. Default time out value is 300 seconds.
-n Gathers Network File System (NFS) information.
-N Suppresses the check for free space required.
-o OutputDevice Copies the compressed image onto the specified device.
-O FileSplitSize Used to enable splitting of the snap output files into smaller files. The size of these files is specified as a parameter to the -O option and must be specified in megabytes. This flag can only be used when the -c flag is specified.
-p Gathers printer information.
-P Files Retrieves the named Files from the fwdump_dir directory.
-r Removes snap command output from the /tmp/ibmsupt directory.
-R Gathers SCSI RAID information.
-s Gathers Systems Network Architecture (SNA) information.
-S Includes security files in general information collected with the -g flag.
-t Gathers Transmission control protocol information.
-T Filename Gathers all the log files for a multi-CPU trace. Only the base file, trcfile, is captured with the -g flag.
-v Component Displays the output of the commands executed by the snap command. Use this flag to view the specified name or group of files.
-w Gathers WLM information.
-X Gathers X.25 (Packet-based Communication Protocol) information.
-Y Gathers InfiniBand information and saves it in the /tmp/ibmsupt/IB directory.
-z Facilitates debug data collection for external products.
Installation of the Virtual I/O Server directly from the HMC
HMC firmware version 7.7.7 allows installation of the Virtual I/O Server directly from the
HMC.
Steps:
1.Download VIOS installation .iso images from IBM website.
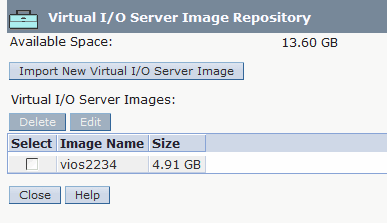
2.Copy installation images to the HMC. Go to HMC Management – Manage Virtual I/O Server Image Repository

3.Complete information where the images can be copied from


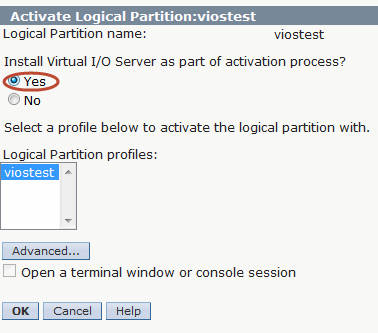
4. Select your brand new VIOS partition profile, and click Operations – Activate – Profile and select Yes for Install Virtual I/O Server as part of activation process?

5. Type in the IP address, subnet mask and default gateway for VIOS.

6. The installation process starts. It will do everything what is necessary to install the VIOS.

HMC console acts as a NIM server. Therefore, if the console is behind the firewall, you must ensure that all ports required by NIM are opened.
7. When the installation finished, open virtual terminal in the HMC vtmenu , and do the first login to the VIOS with a default password padmin for padmin user.
Once the VIOS is installed, you can use it as virtual media repository. It allows you to create virtual drive where you can load OS installation images (IBM i, AIX, or Linux) and proceed with OS installation completely remotely.
ITM Agent on AIX Server
To View the agent running on Server
# /IBM/itm/bin/cinfo -r
To Start an Agent
# /IBM/itm/bin/itmcmd agent start all
{all can be replaced with ul/ux/um}
To Config Agent
# /IBM/itm/bin/itmcmd config -A ul
{ul/ux/um}
PATH Variable Empty Component
Empty Component in $PATH means "Current directory".
If you wish to include the current directory in the search path.You need to keep ":" in $PATH.
Eg:
PATH=:/bin:/usr/bin:/usr/X11R6/bin:/usr/local/bin Current directory first
PATH=/bin:/usr/bin:/usr/X11R6/bin:/usr/local/bin: Current directory last
PATH=/bin:/usr/bin:/usr/X11R6/bin::/usr/local/bin Current directory in middle
With above you can execute the scripts directly from your current path without ./ .
USB Drive Mount Procedure on AIX Server.
1.Connect the USB drive to the server and discover it in OS.
#cfgmgr
2. Find the newly detected USB device name:
#lsdev -C|grep usbms
Ex: assume the newly detected device name is usbms0
3. create the filesystem on USB drive:
#mkfs -V jfs2 -o ea=v2 /dev/usbms0
4. Create the mount point and mount the drive on it.
#mkdir /usbdrive
#mount -o log=NULL /dev/usbms0 /usbdrive
5. Check is drive mounted or not:
# df -g|grep usbdrive
6. copy the data to it
#cp /work/test.txt /usbdrive
#ls -l /usbdrive -- should show test.txt file in it.
Convert the EMC power disk as a boot disk
Convert the EMC power disk as a boot disk
1. Ensure that all hdisks are configured properly
2. Use the rmdev command with the -d option to remove all
PowerPath devices,
including the powerpath0 device. All PowerPath
Devices must be
deleted.
#lsdev -Cc disk|grep
power|awk '{print "rmdev -Rdl "$1}'|ksh
#rmdev -dl powerpath0
4. Run lsdev -Ct power. No devices should be listed in the
output.
5. Determine which hdisks on the storage system will receive the copy Of the operating
system.
6. Run alt_install_disk -C hdisk_list to create the copy on
the storage system hdisk(s).
7. Reboot the system.The system should boot using the hdisks specified
8. Run bootlist -m normal -o to determine which hdisk is in the
bootlist.
9. Use powermt to determine which hdiskpower contains the hdisk
in the boot list.
10. Use the bootlist command to include all the path hdisks for
the hdiskpower
11. Run pprootdev on.
12. Reboot the system.
When the system comes up, rootvg should be using hdiskpower
devices. Ensure that all device connections to the storage system are
established.
Bosboot on power disk
Follow the below steps for bosboot on power
disk
1. #pprootdev fix ( rootvg will
activate on hisks and execute the bosboot
2. #pprootdevfixback ( Again
rootvg will activate on power disk)
Subscribe to:
Posts (Atom)

